 These exercises can be performed after the initial relaxation and before the Sun Salutation. They are particularly suitable for beginners. They help to relax tense muscles. These exercises should be performed gently. Releasing tensions and per- forming the exercises gently are more important than being flexible. The greater your progress, the more you will be able to do of the Rishikesh Series asanas and their variations.
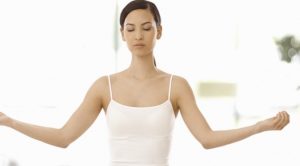
Eye Exercises
Sit up straight, and relax your shoulders and neck. Ideally your forearms should rest on your legs or, if you are sitting on a chair, on a table.
With your eyes open, look alternately from right to left and back 6 times and do not focus on anything. Make this movement harmonious; try to avoid jerky movements.
Then look alternately from up to down and back 6 times, again without focusing on anything and remaining relaxed.
Variations
- Look diagonally from top right to bottom left and back and then the other diagonal, from top left to bottom right and back.
- Roll your eyes in large circles in both directions.
- Describe a horizontal figure 8 with your eyes.
After the eye exercises, or whenever necessary, rub your hands together hard for a moment until you can feel them getting warm. Then cup the palms of your hands over your eyes like two little caves, the darker the bet- ter. Then close your eyes. This enables your eyes and your neck muscles to relax more easily. Enjoy the pleasant sensation of warmth coming from your hands. During this resting phase, breathe in and out about 5 times. Relax more and more each time you exhale.
Effects of the Eye Exercises
Body
The eye exercises improve blood flow to the eye muscles, thereby improving eyesight. Eye exercises can also prevent headaches. The connection between eye and neck muscles means that the neck is also relaxed by the eye exercises as if it was moving gently itself. This kind of relaxation is ideal for people who spend a lot of time working in front of a computer screen and helps avoid a fixed gaze and a stiff neck.
Energy
The lunar and solar energies are harmonized.
Mind
The crossing of the middle line along the nose means that both sides of the brain are used, thus strengthening the links between the left and right hemispheres of the brain.
Mountain Pose – Tadasana
The Mountain Pose helps you to achieve an upright, stable and aware posture.
Stand up straight and motionless like a mountain. The insides of your ankles should be touching, but not so that there is too much pressure on the inside edge of your feet. Feel the outside edges of your feet and then press your big toe joint into the floor to pro- duce a stable tension in the arch of your foot. Spread your toes. Because you are barefoot, your feet have plenty of room to move.
The crown of your head stretches up to the sky and your outstretched fingertips reach for the ground.
Lift your breastbone forward and upward, without hollowing your back. Pull your shoulder blades toward your spine and the bottom of your shoulder blades downward.
Breathe calmly and evenly from your abdomen. The abdominal wall should arch out gently when air flows into your lungs.
Practice this exercise often during the day whenever you have to stand. This will make you focus on ensuring your posture is correct.
Don’t hold it for too long, though, for the vertebrae need to move and your muscles need a break, too.
Shoulder Relaxation
With your inhalation, pull your shoulders up toward your ears, and then lower them as you breathe out. It is important to exhale slowly. Notice how the muscles in your neck area move farther and farther away from your shoulders each time you breathe out.
Chest Opening
As you breathe in, pull both shoulders back, turning your hands outward in the process. Stretch your fingertips slightly toward the floor. Relax as you breathe out. Your shoulders and arms should only turn slightly backward as you do so. Breathe in and out several times in this position.
Energy Exercise
Relax in the standing position. Close your eyes. Concentrate on your fingers; perhaps you will feel a slight prickling sensation or a pleasant feeling of warmth. Let this energy rise up your hands and arms. Feel this energy in your shoulders and up in the back of your head. Breathe calmly and evenly.
Then focus on your toes and feet. Let the energy rise from them up your legs to your pelvis and then up your back to your head.
Breathe calmly and evenly again.
Take a moment to feel this new energy rising inside you.
Self-Massage
Stand up straight. Twist your upper body alternately to the left and right several times, fast enough to make your arms swing. Your head should follow the movement. Your feet should be planted firmly on the floor.
Bend your rear arm slightly, so that you can tap your- self with the back of your hand on your lumbar spine/lower back. In this way, tap as much as your hand can reach of your whole lower back a little at a time. Find the places most in need of massage and enjoy the tapping massage.
The front arm swings round to the opposite side and gently taps the pelvis.
The more you relax, the easier it will be for you to twist. This exercise also mobilizes your whole spine.
Relaxing and Mobilizing the Neck
Lean your head gently to one side with a sigh as you breathe out and hold the position for several breaths. You can even close your eyes. Relax more each time you exhale, and let gravity work. Lift your head again as you inhale and then lean it gently to the other side and then for- ward. You should avoid the passive backward hyperextension of the cervical spine.
If you already have spasms, avoid the additional pulling of your head toward the floor. Your body would just react by tensing up the muscles concerned even more for protection.
Variations
- Push from the side with one hand and from the back with the other simultaneously.
Upright Head Posture
Place your left hand on the left side of your head and push gently. Make sure that you keep your head quite straight. Do this exercise in front of a mirror at first. Later you can close your eyes to facilitate relaxation of all other muscle areas and improve inner awareness. Take several breaths in this position. Let the tension gently fade away.
Then push your right hand against the right side of your head, and finally push your head from behind with both hands, with interlocked fingers. Stretch your elbows out to the side and stretch out your neck. You should not feel any discomfort in your throat.
Always relax between exercises by simply shutting your eyes, standing up straight and being aware of your breathing. Each time you exhale, your tensed muscles will relax more and more.
Knee to Chest – for a relaxed lower back
Lie on your back and stretch out both legs. Feel the curvature of your lumbar spine and be aware of how your lower back feels.
Then grip your right knee and pull it toward your chest. As you breathe in, your thigh should touch your stom- ach, and as you breathe out, pull it closer to your chest as you relax more and more. Your left leg should be equally relaxed on the floor.
Change sides after a few breaths.
To finish, stretch out both legs again, and feel once more the curvature of your lumbar spine and your lower back. Perhaps you have already gotten rid of some tension, thus enabling your lumbar spine to sink nearer to the floor.
Knee Crossover – for a relaxed lower back
Cross one leg over the other and pull them both toward your chest. Hold the lower knee as firmly as possible with both hands. Breathe in with your thigh against your stomach, and as you breathe out, pull your knee closer to your chest. Relax as much as you can while you exhale.
Tip:
If you cannot lay your head down comfortably because your neck curves toward the floor, place a small cushion under your head. Relax your neck.
Leg Raise – to stretch your hamstrings
As you inhale, raise your straightened left leg. Hold it as high as possible for a few breaths and then lower it as you exhale.
Then raise it once more as you inhale and this time, lower it immediately with your next exhalation. Repeat several times with your left leg.
Stretch out both legs and notice how your legs feel. Which leg feels heavier, warmer or even longer?
Then change sides.
Twisted Pose – for a supple back
Lie on your right side and bend both legs and arms. Raise your left arm and place it on your left (side) as you exhale. Let your arm fall nearer and nearer to the floor each time you exhale. Relax.
Come out of that position by taking your arm back as you inhale.
Then lie on your back before doing the exercise on the other side of your body. Notice this new sensation in your back. Perhaps you now feel as though you are lying on a slope, with one side of your body uphill and the other downhill.
Tip:
If you feel pain in your lower back or your left shoulder, pull your top knee back slightly. This will increase the twist so that it is easier for you to place your arm on the floor.
Variations
- Stretch out your bottom leg to increase the stretch.
- Lie on your side and cross your legs to maximize the twist and thus the mobilization of your spine. Only perform this variation if you are still able to relax in this posture.
Abdominal Exercises – Navasana
Abdominal exercises activate the solar plexus and enhance inner balance. Their place in the exercise sequence is after the Sun Salutation and before the inverted poses.
Clasp your hands behind your head. Press your feet gently on the floor, so that your lumbar spine becomes nicely flat. Inhale deeply and then as you exhale, raise your upper body, keeping your elbows by your sides.
In this position, stretch out your head and pull your breast bone toward the ceiling. Even if you find it difficult, try to send your breath right down into your abdomen. Breathe deeply in and out several times (through your nose), and then lower your upper body back down again as you exhale and relax by stretching out your legs and arms.
Variations
- Perform the exercise as described above, but raise your legs beforehand. Bend your knees at right angles and pull your thighs gently toward your chest, not quite creating a right angle with your hips.
- If your head doesn’t need to be supported by your hands, you can also hold your arms out at your sides. This is less taxing for your abdomen, but more so for your neck muscles.
- Raise your upper body without rounding your back.
Tuck up one knee to stop yourself hollowing your back. Straighten the other leg so that it is diagonal to the ceiling if your abdominal muscles are not strong enough, or parallel to the floor if they are. Alternate these leg positions in time with your breathing: lift your straight leg as you inhale and straighten the other one as you exhale.
- Bend your knees and hips. As you exhale, raise your upper body and turn it to the side. Hold this position and continue to breathe calmly and evenly through your nose. Rest a while before working the other side
The Wave
The Wave is a complex exercise that consists of a sequence of 4 movements, and therefore 4 breaths (2 inhalations, 2 exhalations).
- With your first inhalation, press both elbows down into the floor without hollowing your back.
- With your next exhalation, roll your chin onto your chest. The idea is to stretch the back of your neck as much as possible and to lower your collarbone. Pull your elbows together. This is not an abdominal exercise; so only raise your head slightly.
- With your next inhalation, raise your pelvis as you lower your head and your elbows.
- With your last exhalation, unroll your spine, verte- bra by vertebra and lay back down on the floor.
This exercise sequence supples and relaxes your back. So that you can hear your tensions, hum “mmmm” as you uncurl your spine in step 4. Listen carefully. Do you hear a continuous humming or are there a few jerks or even breaks?
Repeat the whole exercise sequence several times until the humming sounds continuous and even.
Post Views: 169